Owncast – Self Hosted Streaming
This is one of the coolest opensource projects I’ve tested out in quite some time. Setup is quick, and the latest release is configured almost entirely in the web GUI. Here’s the project’s website: https://owncast.online/
Github project: https://github.com/owncast/owncast
Highly recommend OBS as the streaming app- https://obsproject.com/ You’ll need OBS or another app on the PC you plan to stream from. OBS allows tons of input options, overlaying inputs, etc. It makes it pretty easy to stream all of the audio and video you want to play on your Owncast site.
Start with an Ubuntu server install- or desktop, doesn’t really matter but you should be using 18.04 or 20.04 LTS. Need to have port 8080 and 1935 available – You can easily change these ports in the admin GUI after installing- or find the config file that sets them in the app files before launching.
Dependencies: unzip, ffmpeg, and golang-go. Running an NGINX reverse proxy for SSL is nice, but not required. You will want it if you’re going to use it for public streaming- otherwise you’ll scare away fans with browser warnings.
Install dependencies: sudo apt install unzip ffmpeg golang-go
Download the zip somewhere with:
wget https://github.com/owncast/owncast/archive/refs/heads/develop.zip
***file location could change someday, check the project on github if it won’t download.
Make a directory to run from, I usually put stuff in /opt, so for Owncast I made /opt/owncast
Extract zip: unzip develop.zip -d /opt/owncast
Go to the files: cd /opt/owncast/owncast-develop/
Install Owncast with: sudo go run main.go pkged.go
Browse to <ip of host>:8080/admin and login with admin // abc123
See documentation for configuration options that you don’t understand, but at this point, you’ve now got a functioning streaming server running on your network. 🙂 The install command also starts the server and is not headless, so you may want to look into scripting the startup to run outside of your current session. Otherwise you’ll need a new terminal window to do anything else on the host while owncast is up.
Edit: here’s a super rigged way of running it in the backgroung: nohup go run main.go pkged.go > /dev/null & bg replace /dev/null with some file if you want to log output. 99% sure you can create a cronjob as r * * * * for reboot and it will run in the background on boot, but like I’ve said before, I’m lazy, and I rarely stream…
Note- the admin password is also your streaming key. Change it before exposing the web server to the public.
In OBS, choose Custom streaming and point to: <ip of host>:1935/live and remember your streaming key is the admin password.
Now, configure the site in your NGINX proxy, it can be on the same host, or another host on the same LAN. I will be posting about putting together a NGINX reverse proxy for 1 to many web servers sometime soon.
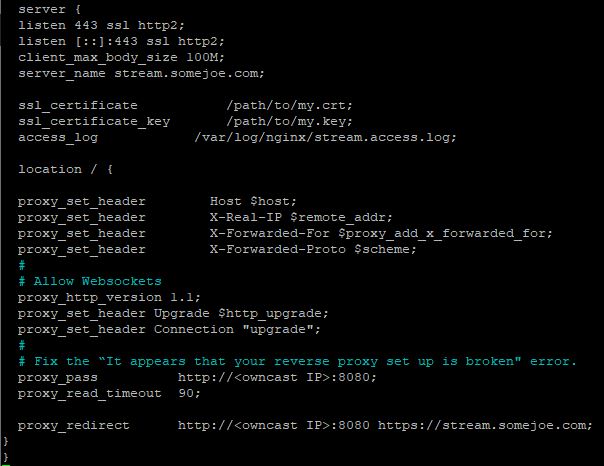
Websockets are needed for the chat to function, be sure to add the few lines in NGINX to make this happen.
Below is my Owncast site config in my NGINX proxy, it handles all of my websites – this config can be replicated many times on the same NGINX host to proxy other web servers. It’s a very effective way to simplify SSL config and secure downstream traffic to your back-end. You don’t really need the listen IPv6 line or client_max_body_size.
server {
listen 80;
server_name mywebsite.com;
return 301 https://$host$request_uri;
}
server {
listen 443 ssl http2;
listen [::]:443 ssl http2;
client_max_body_size 100M;
server_name mywebsite.com;
ssl_certificate /path/to/my.crt;
ssl_certificate_key /path/to/my.key;
access_log /var/log/nginx/stream.access.log;
location / {
proxy_set_header Host $host;
proxy_set_header X-Real-IP $remote_addr;
proxy_set_header X-Forwarded-For $proxy_add_x_forwarded_for;
proxy_set_header X-Forwarded-Proto $scheme;
#
# Allow Websockets
proxy_http_version 1.1;
proxy_set_header Upgrade $http_upgrade;
proxy_set_header Connection “upgrade”;
#
# Fix the “It appears that your reverse proxy set up is broken” error.
proxy_pass http://<Owncast IP>:8080;
proxy_read_timeout 90;
proxy_redirect http://<Owncast IP>:8080 https://mywebsite.com;
}
}
Leave a Reply